
If your faucets are crusted with mineral buildup, your water tastes like chlorine, or your clothes come out of the wash looking dingy, you’re not alone. Millions of homes deal with hard water and contaminants that shorten appliance lifespans and compromise water quality. A whole house water filtration and softener system tackles both problems at the point where water enters your home, before it reaches any tap, showerhead, or appliance. This guide walks through what these systems do, how to choose one that fits your home’s needs, and what installation and maintenance actually look like in 2026.
Table of Contents
ToggleKey Takeaways
- A whole house water filtration and softener system treats water at the point of entry, removing contaminants like chlorine and heavy metals while preventing scale buildup that reduces appliance efficiency by up to 30%.
- Hardness levels, flow rate (measured in GPM), and specific contaminants in your water determine which filtration media and softener capacity you need—start with a home test kit or lab analysis.
- Professional installation typically costs $300–$1,000, but if you’re comfortable with plumbing work, DIY installation can save labor costs; always check local codes and obtain permits before modifying your main water line.
- Routine maintenance including sediment filter replacement every 3–6 months, carbon filter changes every 3–5 years, and monthly salt checks in the brine tank keeps your system performing reliably.
- Total system costs range from $1,200–$3,500 for quality combined filtration and softening, with annual operating costs of $60–$150 for salt and replacement filters—a worthwhile investment that protects appliances over 10–15 years.
What Is a Whole House Water Filtration and Softener System?
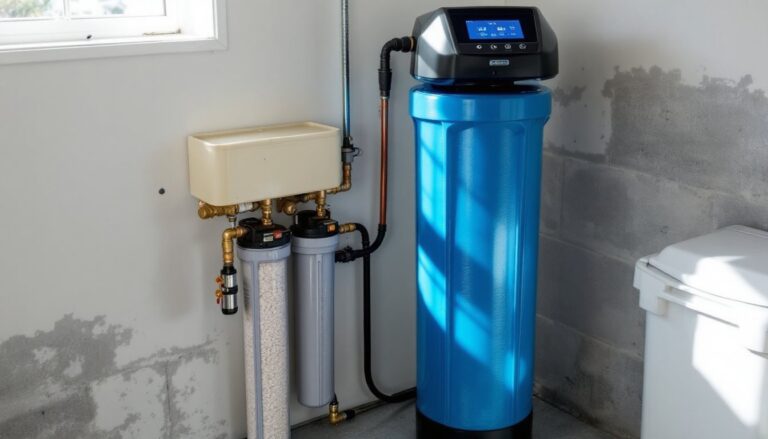
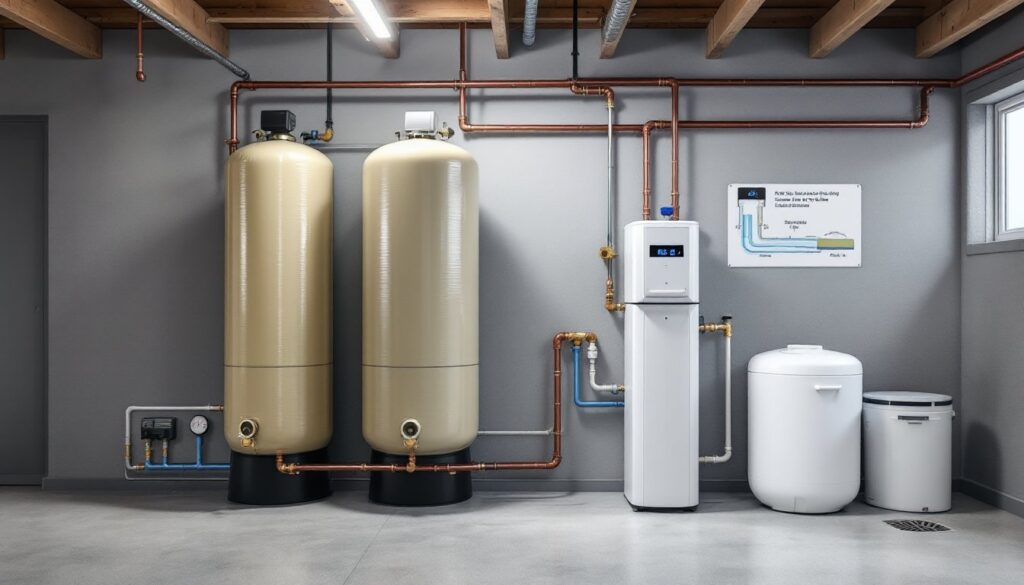
A whole house water filtration and softener system is a two-part setup installed on your home’s main water line. The filtration stage removes sediment, chlorine, heavy metals, pesticides, and other contaminants using mechanical filters, activated carbon, or more advanced media like KDF (kinetic degradation fluxion). The softening stage uses ion exchange to swap calcium and magnesium ions, the minerals that cause hardness, with sodium or potassium ions.
These systems are typically installed in sequence: water flows through the filter first to catch sediment and chemicals, then through the softener to address hardness. Some combo units integrate both functions into a single tank, but most pros recommend separate tanks for easier maintenance and targeted treatment.
Unlike point-of-use filters (like those under your kitchen sink), whole house systems treat every drop of water entering your home. That means cleaner water for drinking, cooking, bathing, laundry, and every appliance connected to your plumbing.
Why You Need Both Filtration and Softening
Filtration and softening solve different problems, and most homes benefit from addressing both. A filter alone won’t stop scale buildup in your water heater or dishwasher. A softener alone won’t remove chlorine, volatile organic compounds (VOCs), or sediment that clouds your water.
Hard water wreaks havoc on plumbing and appliances. Scale accumulates inside pipes, reducing flow and efficiency. Water heaters lose up to 30% efficiency when scale coats heating elements. Dishwashers, washing machines, and ice makers all wear out faster. You’ll also use more detergent and soap because hard water doesn’t lather well.
Contaminants are a separate issue. Municipal water often contains chlorine (used for disinfection), which leaves an odor and taste. Well water can carry iron, sulfur, nitrates, or bacteria. Even treated city water may have trace amounts of lead from older pipes, or pesticides and industrial runoff depending on your source.
Key Benefits for Your Home and Family
- Extended appliance lifespan: Softened water prevents scale in water heaters, tankless units, dishwashers, and washing machines.
- Reduced cleaning effort: No more scrubbing mineral stains off faucets, showerheads, or glassware.
- Healthier skin and hair: Softened, filtered water is gentler, less dryness and irritation from chlorine and mineral deposits.
- Better-tasting water: Carbon filtration removes chlorine and organic compounds that affect taste and smell.
- Lower detergent and soap use: Soft water lathers more effectively, cutting down on soap, shampoo, and laundry detergent.
- Protection from contaminants: Filtration reduces exposure to heavy metals, pesticides, and other chemicals that slip through municipal treatment.
Choosing the Right System for Your Home
Start with a water test. You can’t spec a system without knowing what’s in your water. Municipal customers can request a water quality report from their utility, but those reports don’t capture what leaches from your home’s plumbing. Home test kits (around $20–$50) measure hardness, pH, chlorine, iron, and sometimes lead or bacteria. For well water, send a sample to a certified lab for comprehensive testing including nitrates, arsenic, and coliform bacteria.
Hardness level determines softener sizing. It’s measured in grains per gallon (gpg) or parts per million (ppm). Moderately hard water (3.5–7 gpg) may only need a smaller softener, while very hard water (10+ gpg) requires a larger resin tank and frequent regeneration cycles.
Flow rate is critical. Calculate your home’s peak demand in gallons per minute (GPM). A typical household fixture uses 2–3 GPM: a shower uses 2.5 GPM, a dishwasher 2–3 GPM, a washing machine 3–4 GPM. Add up simultaneous use scenarios. If your system can’t handle peak flow, you’ll notice pressure drops when multiple taps run. Most whole house systems are rated for 10–20 GPM, but verify it matches your home’s plumbing (1-inch lines handle roughly 10 GPM: 1.5-inch lines handle 20+ GPM).
Filter media depends on your contaminants. Sediment filters (5–20 microns) catch rust, sand, and silt. Activated carbon removes chlorine, VOCs, and improves taste. Catalytic carbon handles chloramine, which some municipalities use instead of chlorine. KDF media removes heavy metals and inhibits bacteria growth. If you have specific issues like arsenic or fluoride, you’ll need specialty filters (reverse osmosis or activated alumina).
Softener resin capacity is measured in grains. A typical 1-cubic-foot tank holds about 30,000 grains of hardness removal capacity before regeneration. Multiply your daily water use (gallons) by your water’s hardness (gpg) to estimate how many grains you need to remove per day. Size the system so it regenerates every 3–7 days for efficiency.
Salt vs. salt-free options: Traditional ion-exchange softeners use sodium or potassium chloride and require drain access for regeneration cycles. Salt-free conditioners (template-assisted crystallization or TAC) don’t remove hardness, they alter the structure of minerals so they don’t stick to surfaces. They won’t prevent scale as effectively, but they require no salt or drain line.
Installation: DIY vs. Professional Setup
Installation difficulty depends on your plumbing skills, available space, and local codes. This is not a beginner project. You’ll be cutting into the main water line, soldering or using push-fit fittings, and potentially running a drain line and electrical.
Location requirements: Install after the main shutoff valve but before any branch lines. Most systems go in the basement, garage, or utility room. You’ll need a level, stable floor capable of supporting 200–400 pounds when tanks are full. Allow at least 10 inches of clearance above tanks for media replacement and access to control heads. Position the system near a floor drain or sump for regeneration discharge, and within reach of a 120V outlet if using electronic controls.
Plumbing work: You’ll cut the main line (typically ¾-inch or 1-inch copper, PEX, or CPVC), install shut-off valves before and after the system, and connect inlet/outlet ports with the appropriate fittings. Use compression fittings, SharkBite push-fit connectors, or solder joints depending on your pipe type. Include a bypass valve loop so you can isolate the system for maintenance without shutting off water to the whole house.
Run a drain line (½-inch to ¾-inch) from the softener’s control valve to a floor drain, sump, or standpipe. Check local plumbing codes, some jurisdictions require an air gap to prevent backflow. The drain line must be gravity-fed and should not exceed the manufacturer’s maximum length (usually 20–30 feet with minimal elevation change).
Electrical: Many modern systems use electronic control valves that require a standard outlet. If no outlet is nearby, hire an electrician or run one yourself if you’re comfortable with basic wiring and your local code allows it.
Permits and codes: In most areas, replacing or modifying main water line plumbing requires a permit. Check with your local building department. Some municipalities have restrictions on water softener discharge due to salt impact on wastewater treatment plants. Ignoring code can affect insurance claims or home sales down the line.
When to call a pro: If you’re uncomfortable soldering copper, cutting into your main line, or working around your water heater and shutoff valves, hire a licensed plumber. Professional installation typically runs $300–$800 for labor, depending on complexity and regional rates. It’s worth it for peace of mind and code compliance.
Maintenance and Long-Term Care Tips
Whole house systems need routine attention to perform reliably. Skipping maintenance leads to fouled filters, channeling in resin beds, and eventual system failure.
Sediment filters: Replace pre-filters every 3–6 months, or sooner if you see pressure drops. Check the filter housing each time, sediment buildup indicates the filter is doing its job, but waiting too long can clog your downstream components.
Carbon filters: Most activated carbon tanks need media replacement every 3–5 years, depending on chlorine levels and water volume. You’ll notice declining taste and odor performance when carbon is exhausted. Mark the installation date and set a calendar reminder.
Softener salt: Check the brine tank monthly. Keep it at least half-full with the right type of salt, solar salt pellets or evaporated salt pellets work best (avoid rock salt, which leaves residue). Break up any salt bridges (hard crust above water) with a broom handle. Clean the brine tank annually to remove sediment and prevent buildup.
Resin bed cleaning: Over time, iron, manganese, and organic matter can foul resin beads. Use a resin cleaner (often citric acid or specialized formulas) every 6–12 months, following manufacturer instructions. This restores exchange capacity and prevents channeling.
Control valve settings: Verify regeneration cycles are triggering correctly. Most systems regenerate based on water usage (metered) or time (days). If your usage patterns change or you add household members, adjust the settings to prevent running out of soft water between cycles.
Annual inspection: Check all fittings and connections for leaks, inspect the drain line for obstructions, and test water hardness with a hardness test kit to confirm the system is performing. If hardness starts creeping up, it’s time to troubleshoot the resin or control valve.
PPE for maintenance: Wear gloves and safety glasses when handling salt, chemicals, or opening filter housings under pressure. Depressurize the system using the bypass valve before removing any filters.
Cost Breakdown: What to Expect in 2026
Pricing varies widely based on system capacity, filtration media, and installation complexity. As of 2026, here’s a realistic breakdown:
Equipment costs:
- Basic sediment + carbon filter system: $400–$1,200
- Mid-range whole house filter (multi-stage): $800–$2,000
- Water softener (30,000–60,000 grain capacity): $500–$1,500
- Combined filtration + softening system: $1,200–$3,500
- High-end systems (UV sterilization, advanced media, smart controls): $3,000–$6,000+
Installation: DIY saves labor but expect $100–$300 in fittings, valves, and miscellaneous plumbing supplies. Professional installation adds $300–$1,000 depending on your region and job complexity. Many homeowners find that whole house systems cost less to maintain over time than you’d expect.
Ongoing costs:
- Salt: $5–$10 per 40-pound bag: average household uses 6–10 bags per year ($60–$100/year)
- Replacement filters: $50–$150/year for sediment and carbon cartridges
- Media replacement (carbon, resin): $100–$400 every 3–5 years
- Annual maintenance supplies (cleaners, test kits): $20–$50
Operational costs: Softeners use water during regeneration (40–80 gallons per cycle) and a small amount of electricity for electronic valves (about $2–$5/year). Factor in slightly higher water and sewer bills if your municipality charges for discharge.
Regional and market factors: Prices fluctuate with material costs, shipping, and local labor rates. Coastal or remote areas often see 10–20% higher costs. Shop multiple suppliers, and compare specs carefully, some budget systems use lower-grade resin or thin-walled tanks that don’t last. Installing systems yourself is worth considering if you’ve tackled plumbing projects before, but expert installation guarantees warranty coverage and code compliance.
Budget for the full lifecycle cost, not just the sticker price. A quality system with proper maintenance will outlast cheap alternatives and protect thousands of dollars in appliances and plumbing over the next 10–15 years. When you’re reviewing options, pay attention to how top-rated filtration systems compare in long-term value, not just upfront price.